

Toon shading: how to create stylised 3D scenes - penningtonjusnis
Toon shading: how to create stylised 3D scenes
Animated cartoon shading is a great means of achieving the stylised retro sci-fi, manga and comic art aesthetics that so many 3D artists strive for. As a matter of fact, breaking away from realism often sets the bar for how tools and software are victimized. With that in thinker, why not explore the top software to heighten your stylised aesthetics in our rundown of the top-quality 3D molding software?
There are many distinct ways to create and develop toon shaders and a variety of different styles to explore. Toon shading can sometimes appear complex, but in this quick step by step guide renowned illustrator and concept creative person Amir Zand will need you direct a easy process that he used to create his breathtaking piece Break Time.
Zand will cover setting up the scene, creating toon material and texturing geometries using the Arnold Renderer Toon shading system in order to create a stylised 3D scene. Afterwards creating the scene atomic number 2'll show you how to use Photoshop for post-production to push the image even further. Countenance's get rolling.
01. Get started with a sketch
(Image: © Amir Zand)
I normally try to lead off the creator serve with some excitable thumbnails and sketches in my sketchbook to form some initial ideas and compositions; whether I'm working in 3D software or painting in 2D, it helps me to possess a basic idea of what I am hoping to reach.
02. Set astir the scene
(Image: © Amir Zand)
Next, I set up my scene with some 3D-scanned rock geometry exploitation Quixel Bridge. It's good to mention here that I Don River't need the textures and am only using the geometries to mix and create a base for my landscape. I used three different scans and mixed them to have an early al-Qaeda for my scene.
03. Build it up with additional details
(Epitome: © Emeer Zand)
Since I'm aiming to create an illustration, inchoate on I would try to find the most suitable angle and congeal up my camera (locked) and add the additional details and planes based on my composition. As you can assure in the screenshot, I've duplicated more or less of my geometry to add some rocks in the distance, and also have a dismissive distance for my point tip which is the monolith itself.
Also, I be intimate to point out that the Adobe Mixamo subroutine library is a great imagination featuring thousands of characters and full-consistence animations, which you can use to pose the figures. The Engineer model is past o0ozexo0o on Sketchfab.
04. Tweak the light
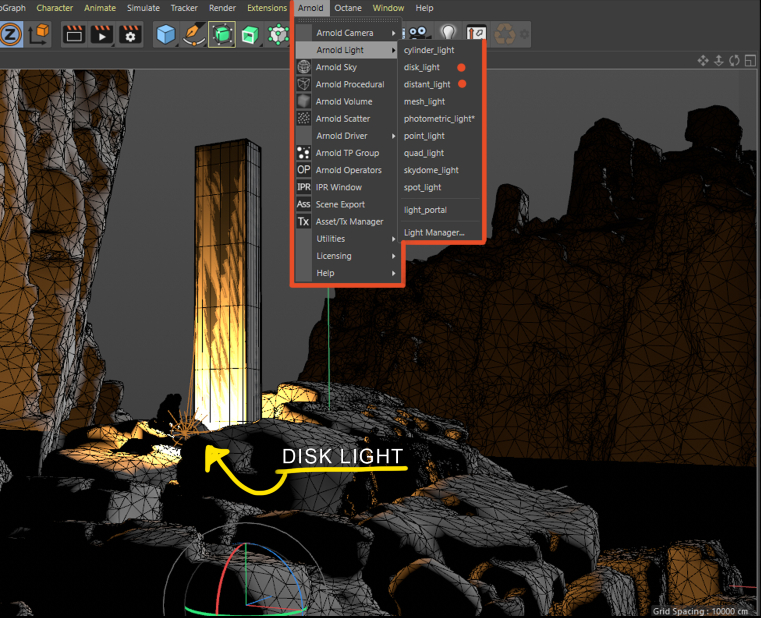
(Image: © Amir Zand)
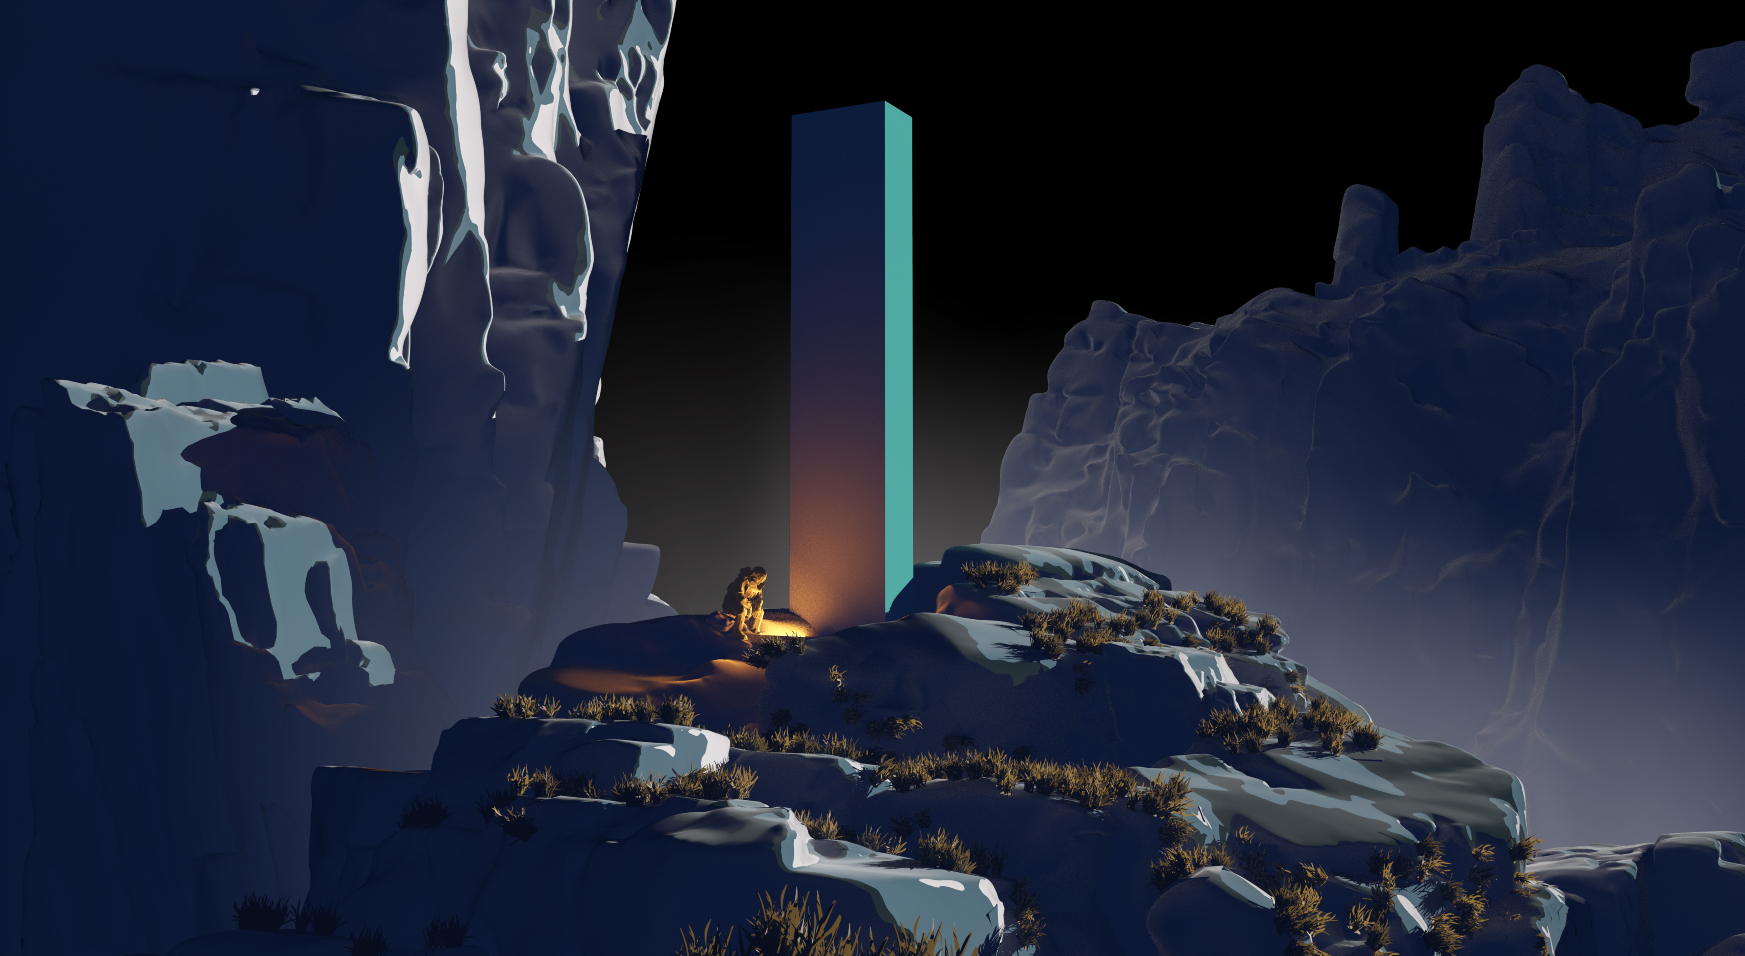
This future step is all about setting up my light, using Arnold Renderer's Remote Casual for global lighting, and Disk Light for small spotlights by the monolith (although it requires some more adjustments happening the material to line up the impact). I was aiming to let a moonlight setup with a soupco of lovesome light by the monolith to represent fire. Both these lights are accessible under Arnold Light.
05. Create toon material
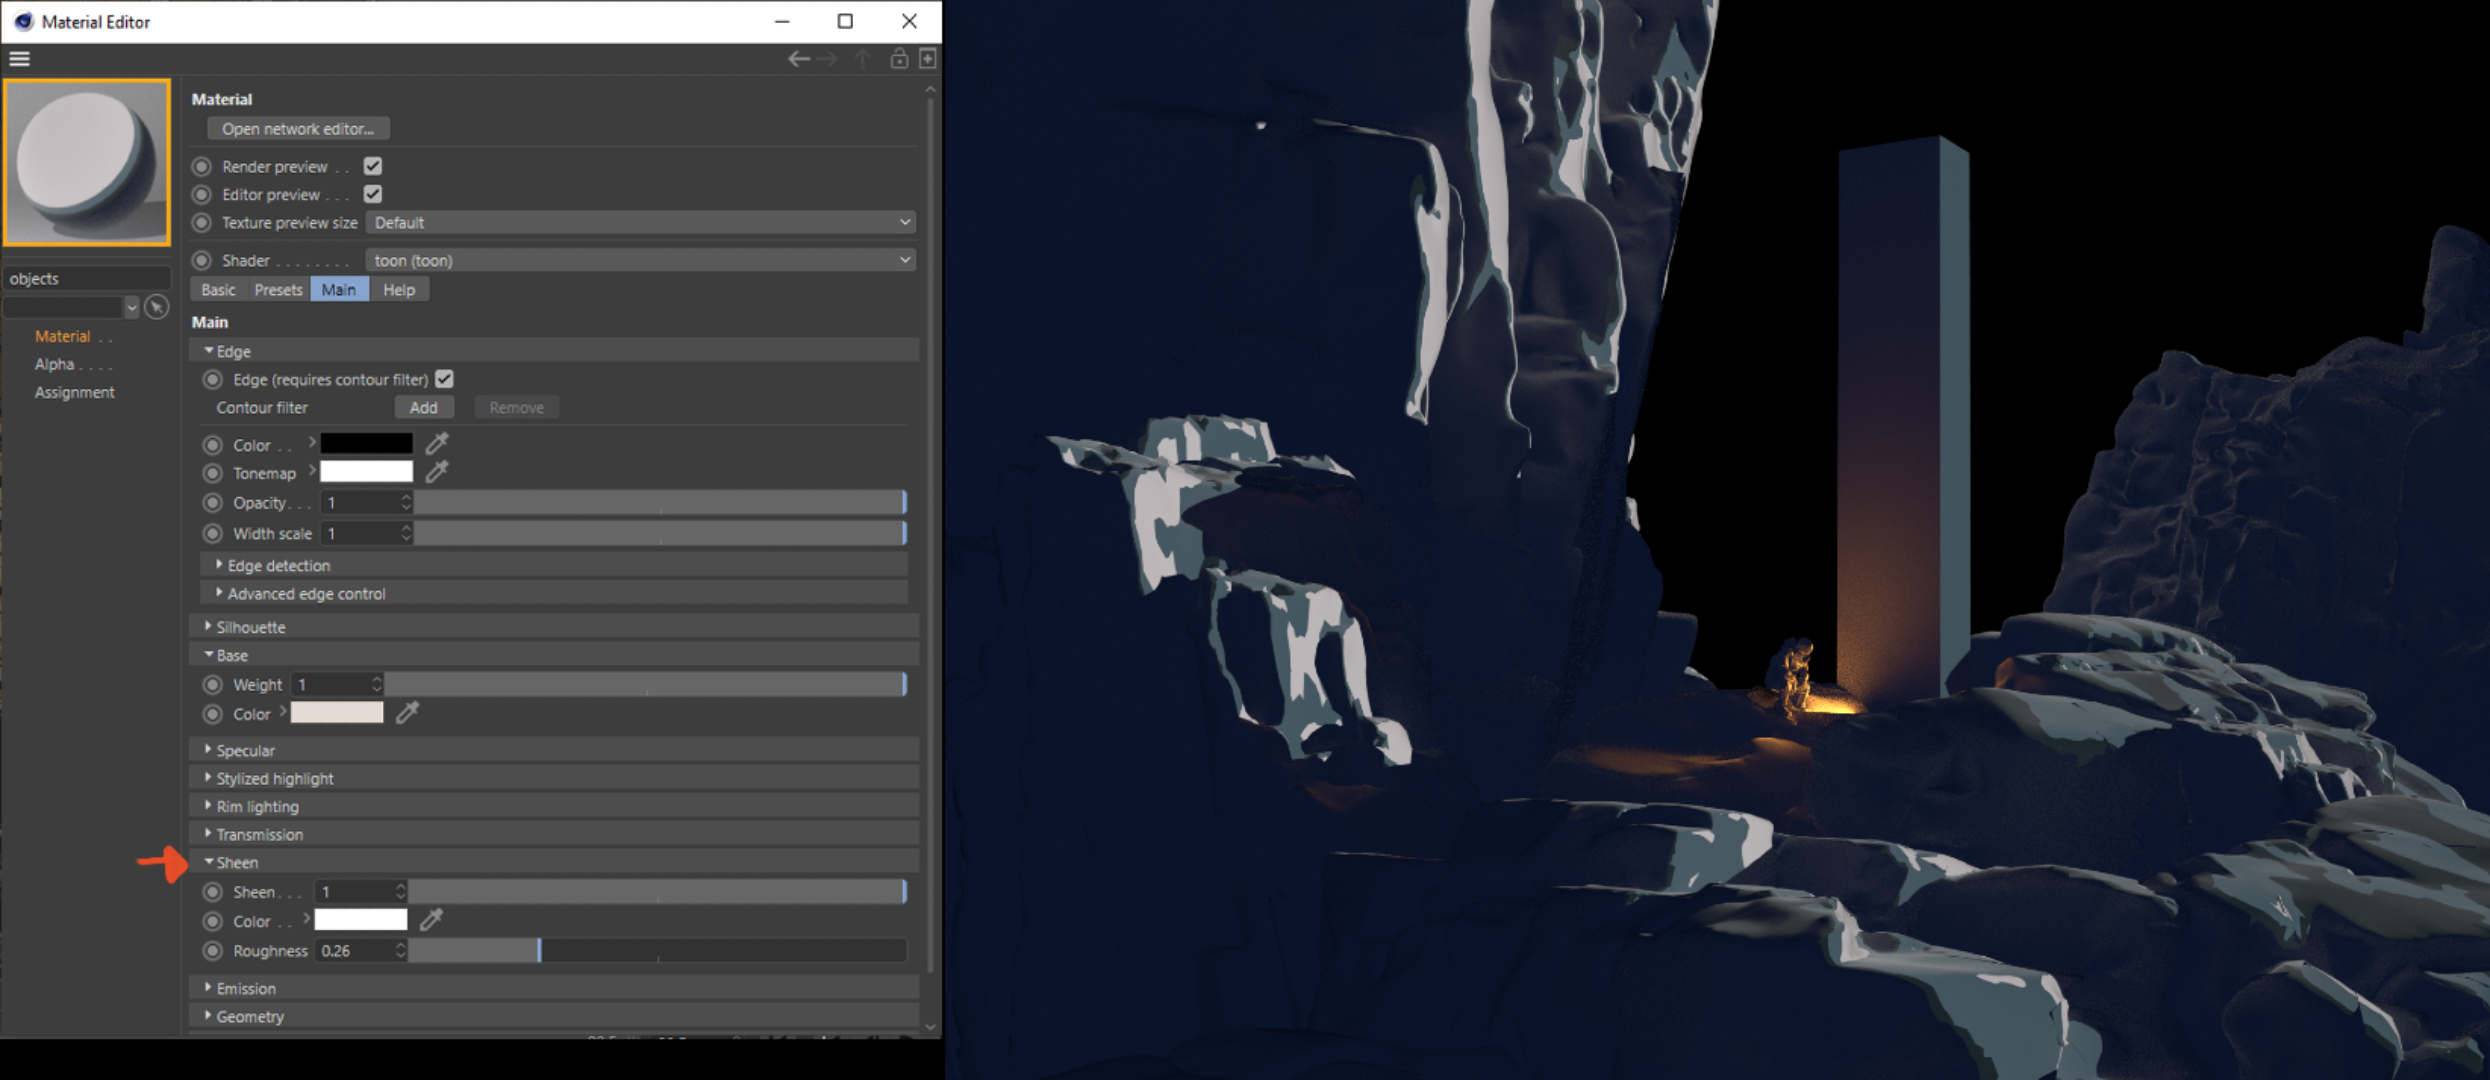
(Fancy: © Amir Zand)
In this dance step, I'll create my early base toon material. Simply click Make over in the Celluloid 4D material section then Arnold>Opencast>Toon and you possess a toon material, double-click and it opens the Material Editor. At the top select Arnold Shader Network Editor to access nodes, from on that point I earn a Ramp_rgb from the Texture category. Connect it to your Tonemap. This will allow you to circle steps of colours to your material, from light to midtones to shadow. Change the Type from Custom to U in order to see the impact in the render preview. You can also deepen the interpolation between each shader, for now, I used Step for a many hard-edge core happening my image.
I've practical my fabric to all the geometries available in my tantrum. Succeeding, I would go to the Material Editor again and under the Sheen section, I would vary IT to 1 and play with the Indentation. As you seat see in the screenshot, this wish change the elbow room light stool impact your bodily you bet it absorbs light, thus playing with it to find your desired light impact and reflection is requirement.
06. Attention deficit hyperactivity disorder an outline upshot
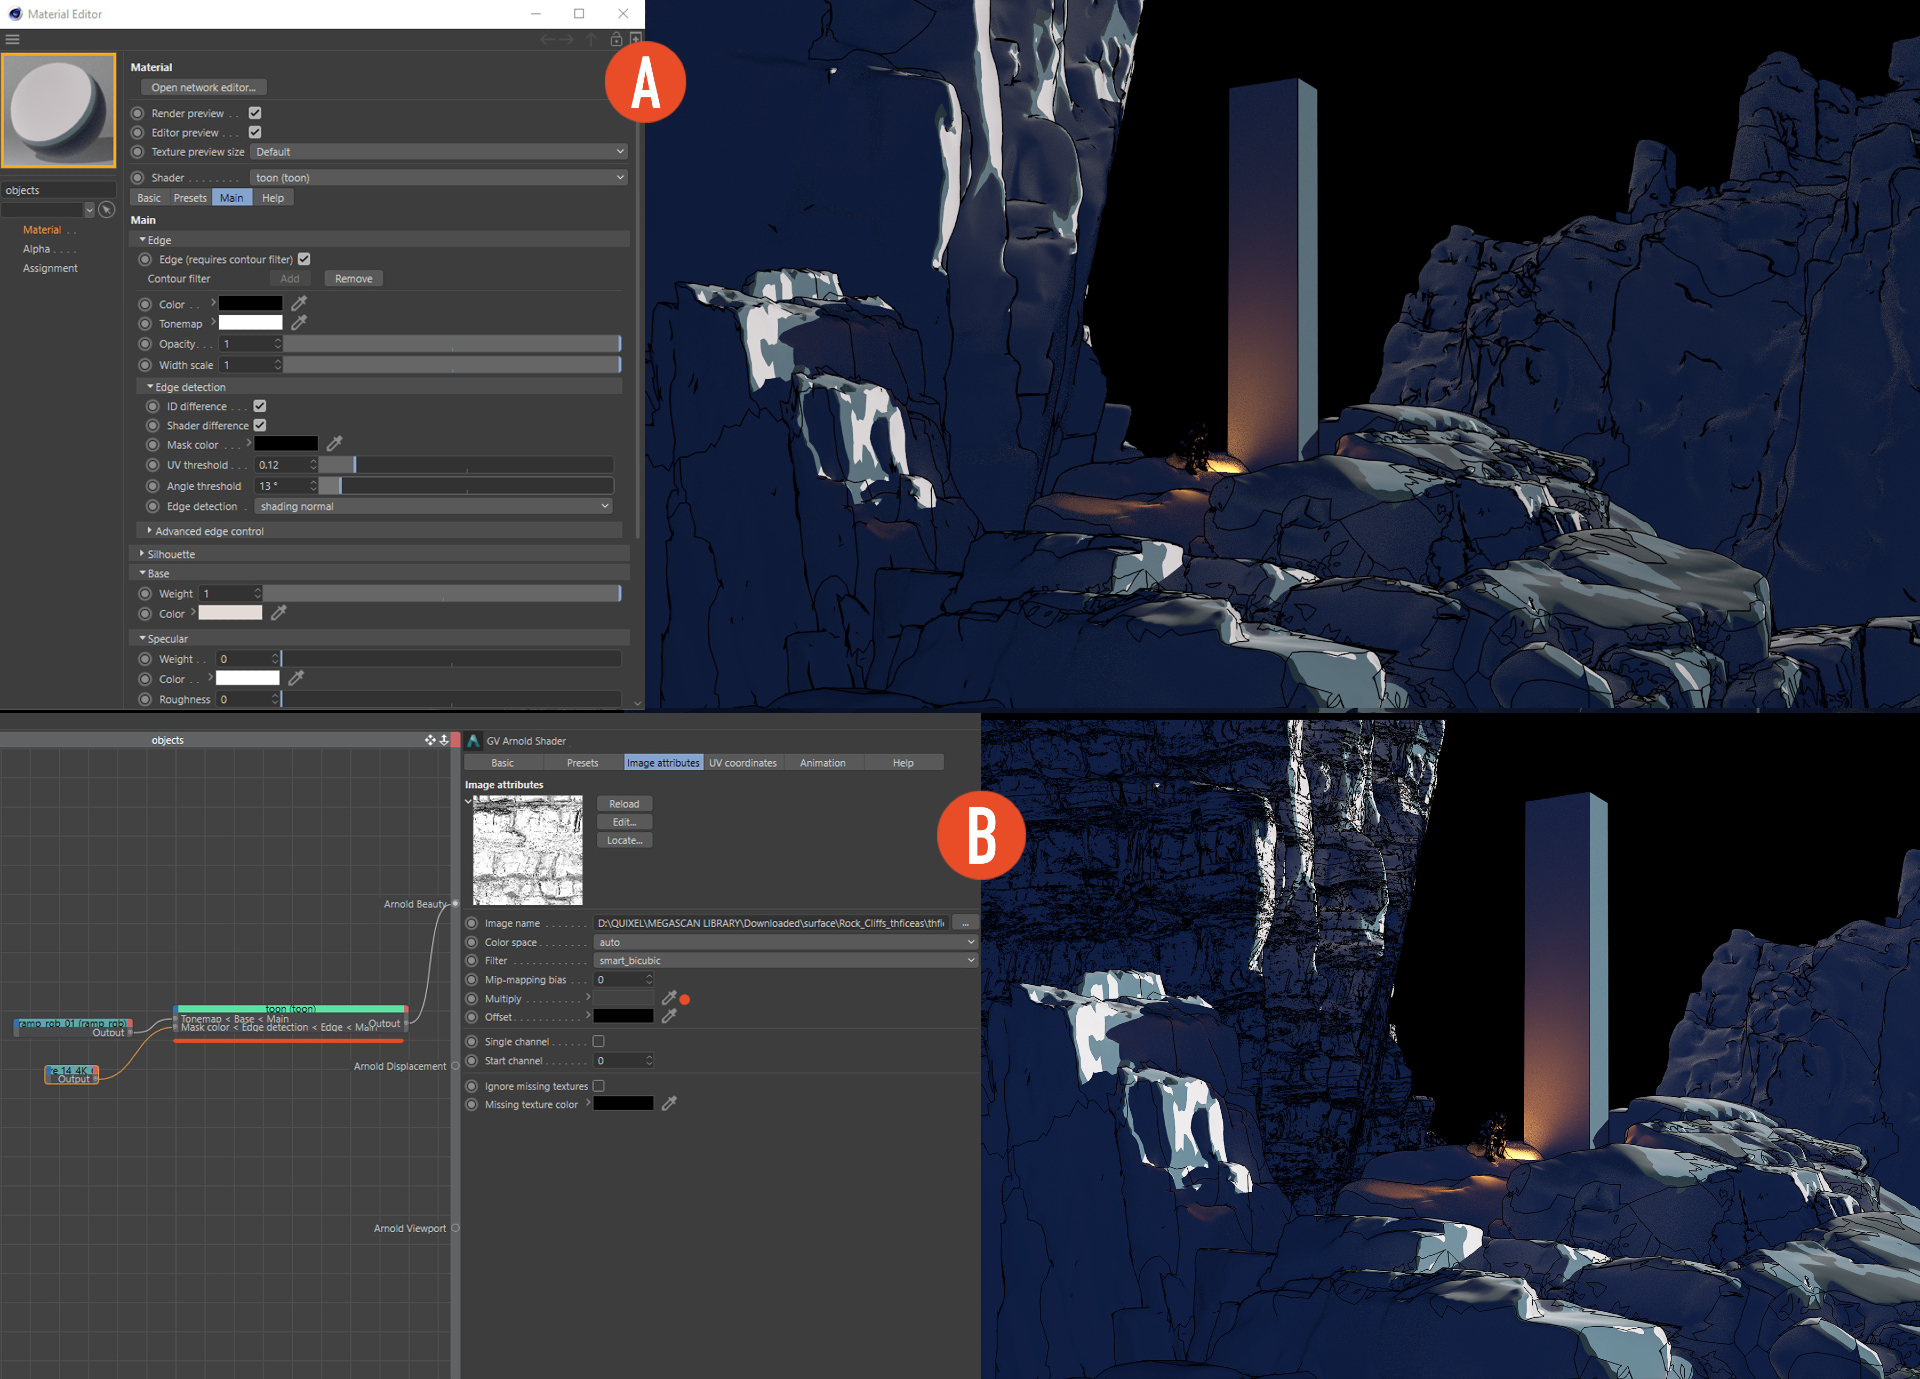
(Pictur: © Amir Zand)
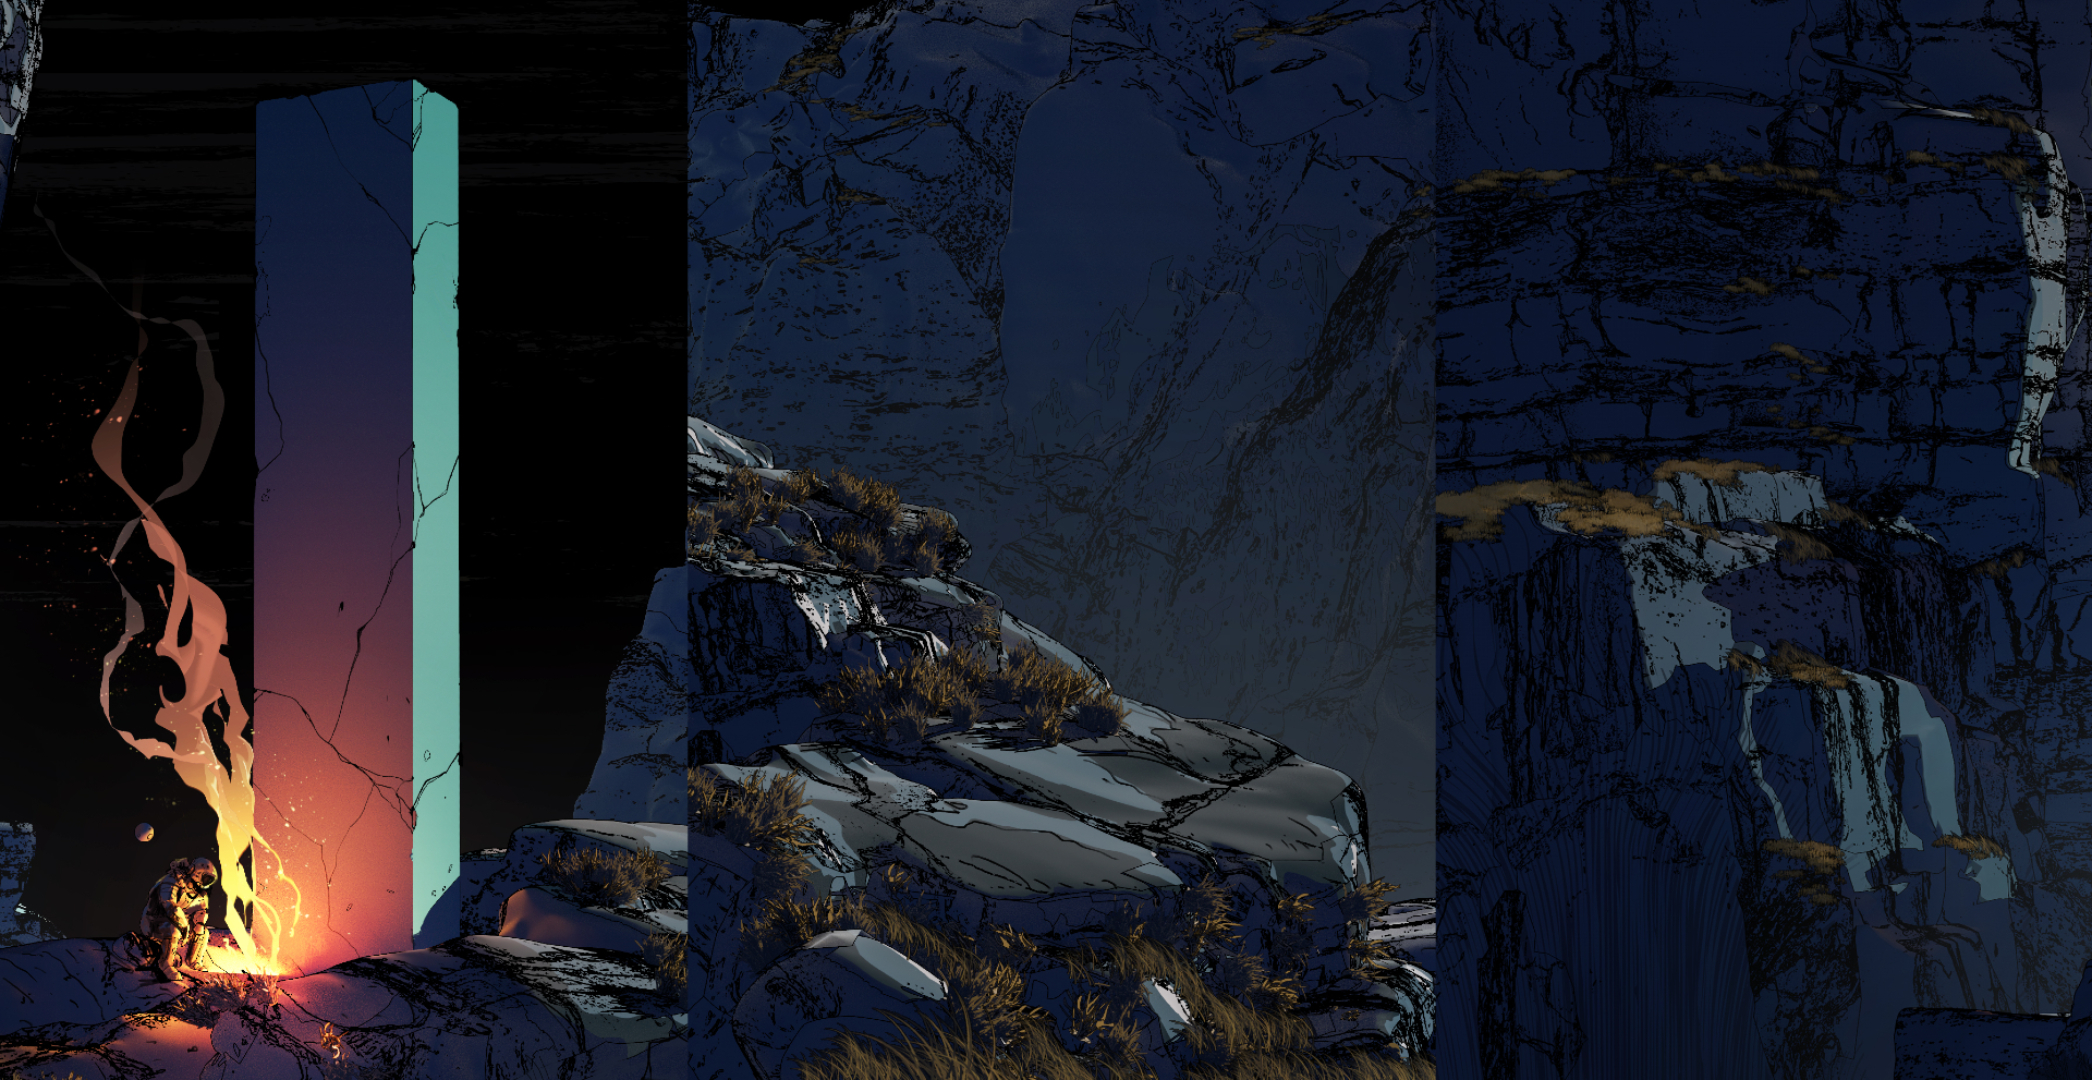
Go to the Render Settings in Arnold Renderer and change the default filter to Contour. Now you'll start to hear some lines seem on your scene. To step-up the effect operating theater change how it outlines your geometry, you can pluck the Edge Detection, UV Threshold and Angle Threshold in the Material Editor.
Like a sho to bring down a bit more complexity to the shader I would merely trail and drop a raggedness texture in my node editor and touch base it to my Mask Colorize, tweaking the Multiply tone to change the right smart that it impacts my fit. I practical this material only on the top-left rock, while other geometries have a simple outline effect.
07. Process your final details and export
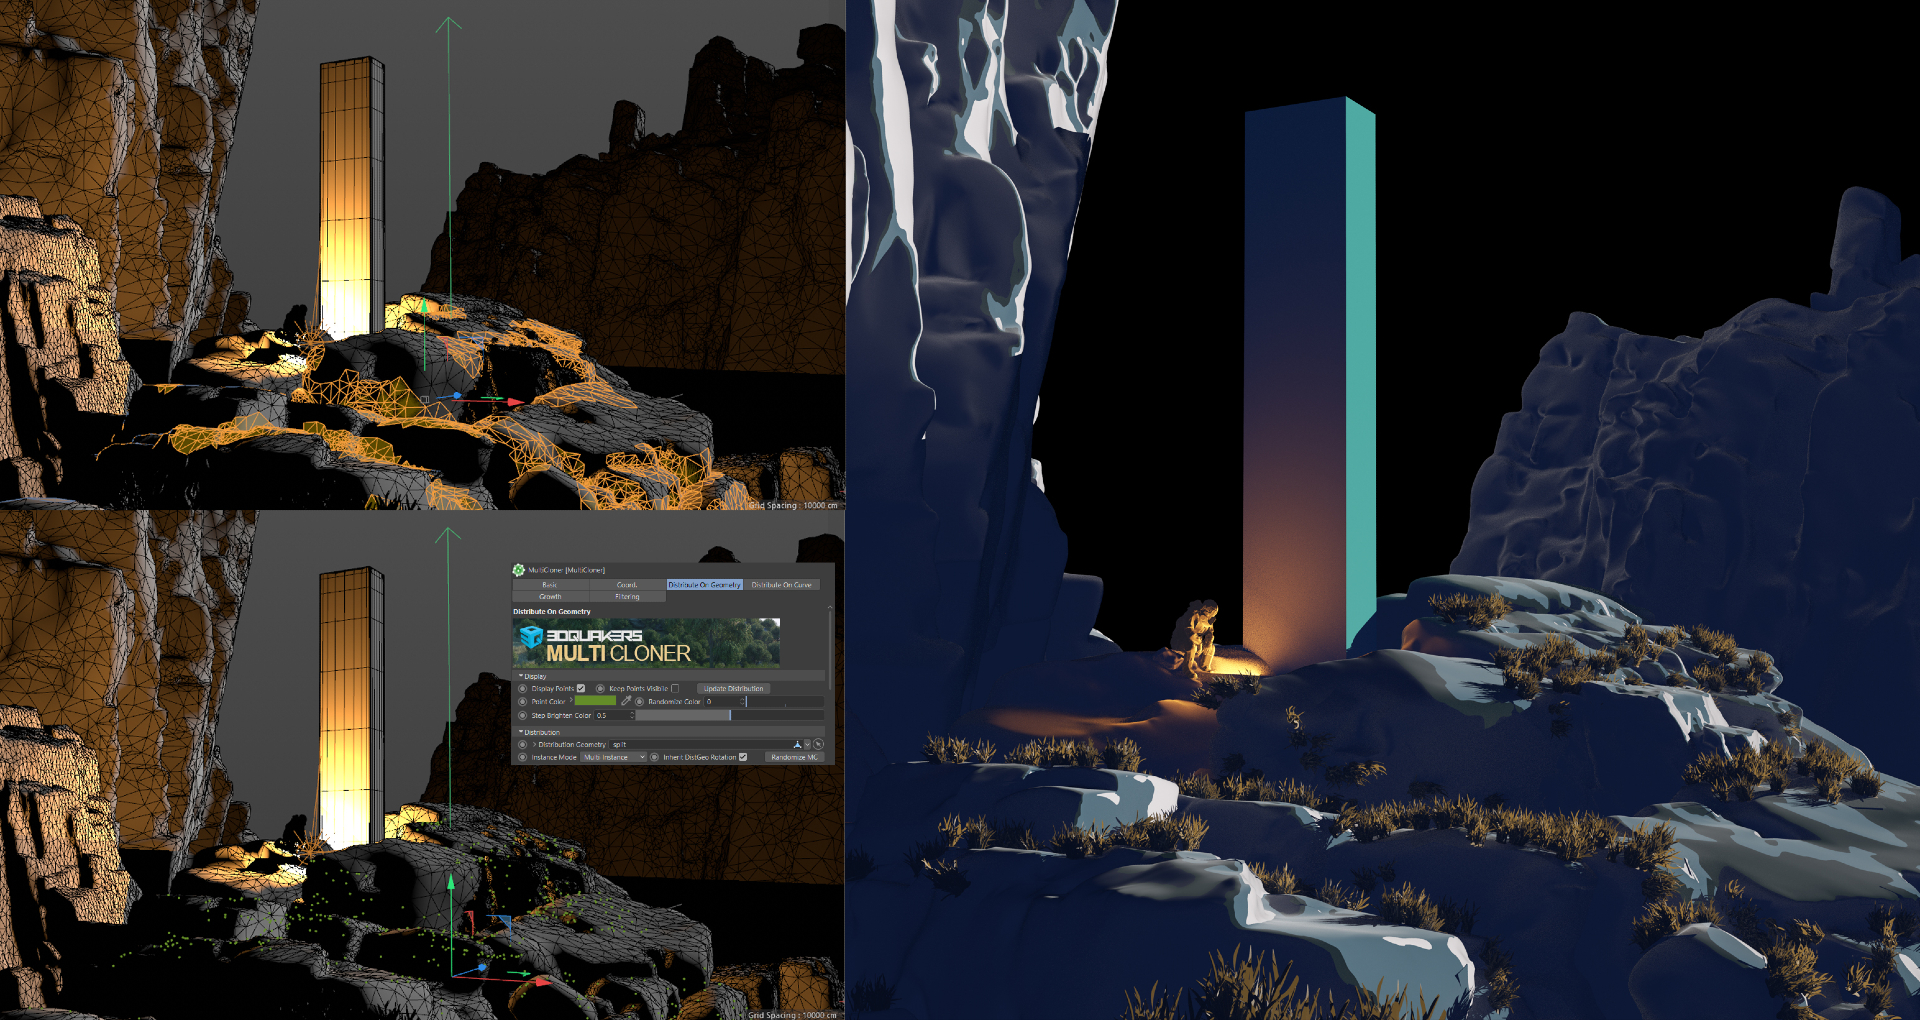
(Image: © Amir Zand)
From Hera along I duplicate my briny base textile, change the colour and personal effects as I've explained for each geometry, and go for them to the picture. I've added about grass over to the environment using the Quixel Bridge depository library once more, selecting the areas I require from my Ultraviolet, Split and victimisation Forester Multicloner to scatter it in my setting.
Finally, my scene is ready to exportation. Ace thing I do is delive my scene multiple times to bread and butter things disjointed. First I get a default render with the Blackman_Harris filter, and then another render using the Contour permeate. Make sure to render in the Alpha channel, so saving as PNG while rendering with Form will simply save the outlines and edges instead of a apartment see. This will afford you much more room to edit and refine lines.
08. Import to Photoshop
(Image: © Emeer Zand)
As I explained in the last step, I render multiple multiplication or in multiple passes, and nonpareil thing I always do is chemical group my scene into classic foreground, middle-solid ground and background. Sometimes when it's more complex I would render all individualist geometry so I crapper actually mask each part well in Photoshop, as this gives me freedom to edit colours, apply post visuals and have disjointed planes. You can see on the right how they are fully masked and how a simple gradient effect can separate planes and give more profundity to the image.
09. Refine your image in post-product
(Epitome: © Amir Zand)
For me, it's important to have my fix the double. I refine, overpaint, redraw lines, correct lighting and add additional details to my scene, this is an all important part for me that takes more clip than creating the scene itself.
Eastern Samoa you can view, I have redrawn crack lines, overpainted the scene with more grass, smoke and lastly rectified the tone, depth and final visual touches to reach the finished instance.
This article was originally published in 3D World , the world's best-selling magazine for CG artists. Subscribe to 3D World .
Read more:
- Digital artists you need to know more or less
- Free Photoshop actions
- 3D art: undreamed examples to inspire you
Amir Zand is an illustrator and concept artist, specialising in visual development and marketing illustration. He currently works at Quantic Aspiration.
Related articles
Source: https://www.creativebloq.com/how-to/toon-shading-how-to-create-stylised-3d-scenes
Posted by: penningtonjusnis.blogspot.com
0 Response to "Toon shading: how to create stylised 3D scenes - penningtonjusnis"
Post a Comment